Optimize images
How companies can optimize images: Create web-optimized images without help
Nowadays, photos and graphics are often used on websites to visualize content. As infographics, product photos, contribution images, team photos or mood images, they liven up websites and ensure a better user experience.
However, blurred and pixelated graphics can have the opposite effect, which is why various questions often arise when it comes to optimizing images. In addition to the requirement for good image quality, the image size is also important.
If you optimize images and integrate them correctly, this can have a positive impact on search engine optimization. So that you can optimize and implement images yourself in future, we will explain below how this works and which tools and editing programs you can use to prepare your media for uploading.

The right image size
Image data can generate large amounts of data, i.e. the smaller you save the image file, the faster your page loads. If a website takes too long to load, the user may click back to the search engine and leave your site. To ensure that your image file does not require too much loading speed, you should select the image dimensions so that they are not larger than the intended display size on the website and, if in doubt, it helps to optimize the images afterwards using a tool.
The image resolution mythOnly the pixel dimensions, i.e. the image size in pixels, are relevant here. In order to optimize the image size of the images, the information on the resolution of the image, which can be defined in image editing programs such as Adobe Photoshop, is not relevant. The reason for this is that a monitor or screen has a defined, unchangeable resolution and therefore the displayed size of the image is only affected by the pixel width and pixel height in relation to the resolution of the monitor. The DPI information is always ignored when it comes to displaying an image on the screen.

The right file format
First look at what type of graphic your image is. A distinction is made between pixel graphics, which are made up of millions of pixels, and vector graphics, which consist of mathematically precisely described points, lines and curves. Vector graphics often require less memory than pixel formats, as only parameters and not every single color pixel has to be saved. Depending on the type of presentation, a different format is suitable for displaying the images in an optimized way.
You will recognize the difference between a pixel graphic and a vector graphic if you enlarge the graphic considerably. A vector graphic has a sharp edge at the transition between the colored areas. In a pixel graphic, the edge is blurred and "steps" are formed.
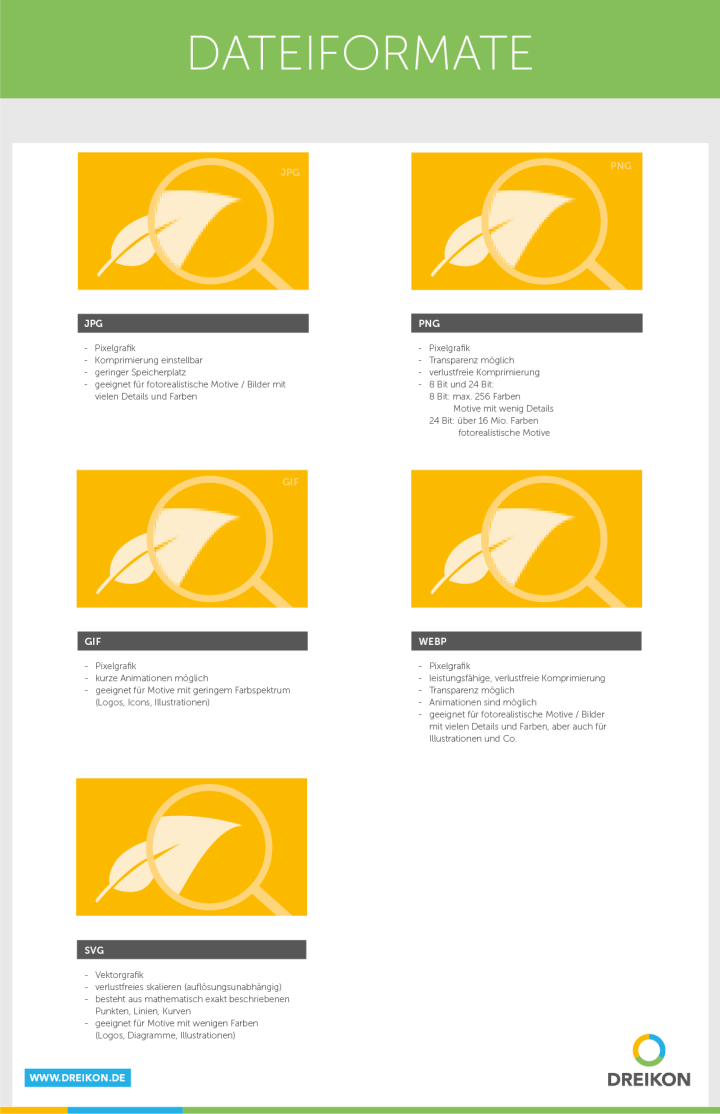
You can find an explanation of the six most important file formats in our infographic. You can use this information to assess which format is suitable for your intended use and whether conversion is advisable.
JPG (Joint Photographic Experts Group)
JPG is probably the most widely used image format on the web and was developed for saving photographic images. It is suitable for images with photorealistic motifs, many details and many colors, if a small volume of data is to be saved. The JPG can display up to 16 million colors. In addition, high compression is possible with a small amount of data. A major advantage of the format is that JPGs are compatible with all browsers and text and graphics programs and are also displayed correctly on all computers, tablets or mobile devices. One disadvantage is that with monochrome images, the lossy compression becomes visible very quickly and any further image compression also degrades the image quality. Optimizing JPG images therefore does not always make sense.
PNG (Portable Network Graphics)
The PNG format is not yet as widespread as JPG and is therefore one of the somewhat younger image formats. This format can save different colour depths and therefore also determine the file size - this is ideal for optimizing images. It can be saved as 24-bit (the standard for photorealistic motifs) so that it can display over 16 million colors. However, it can also be saved as 8 bit, so that only up to 256 colors are displayed and thus a smaller storage capacity is used. This version is therefore ideal for photos and graphics with few details and colors. Another special feature of PNGs is that they have a wide range of transparency. This means that it can be saved from completely opaque to completely transparent. One disadvantage is that the data size of PNGs is larger than that of JPG files, as the compression is not lossy.
GIF (Graphics Interchange Format)
The GIF format can display a maximum of 256 colors and is therefore not suitable for photorealistic motifs and detailed images. With the GIF, it is possible to play short animations, whereby several individual images are displayed one after the other. As an animation, the GIF has been experiencing a significant upswing in social media use for several years - but it is very rare to find it on websites. It is used more frequently for motifs with few colors, such as logos, icons or illustrations. Due to its small storage size, it is rare that GIF images need to be optimized.
SVG (Scalable Vector Graphic)
The SVG format is a vector format. There is no image size with pixel dimensions here. This format also has an advantage: as it consists of mathematically described points, the vector format is resolution-independent and can therefore be scaled as required. It is therefore used for motifs with simple, graphic content, such as vector graphics, e.g. logos, icons, diagrams or illustrations. One disadvantage of SVGs is that the file size increases rapidly if the displayed element consists of a large number of small elements.
WebP
This file format originates from Google and is used comparatively rarely. It is a sister project of the WebM video format. A clear advantage is that it can be compressed by up to 25 % without loss and therefore contributes to fast loading times. It is suitable for opaque and transparent images and promises a smaller file size compared to the other graphic formats. It is therefore very suitable for displaying optimized images with a smaller size. As Google itself is the publisher, possible positive effects on the search engine ranking cannot be ruled out. One disadvantage is that it is not supported by all browsers - you should definitely check this before using it.
Important: Avoid large file formats such as TIFF files, as these are not suitable for the web.
Optimize images and improve loading time
Loading time is one of many criteria for optimization in organic search. If you forget to optimize images, this will result in long loading times. If your website loads too slowly, this can result in a loss of ranking, high bounce rates on your site and poor conversion rates. Whether you should carry out image compression and how it performs can be checked in a page speed test, for example with Google PageSpeed Insights. Based on the findings, it is easy to see how you should optimize your website and your images in order to achieve better results.
One important key figure for you is the Largest Contentful Paint (the time until the largest file on the page is loaded in the viewport). The optimization of images, or more precisely the compression and uploading of correctly scaled files, has a direct impact on this key figure and therefore on the loading speed.
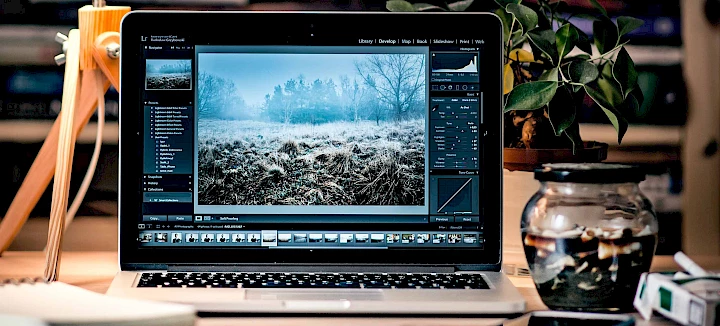
Optimize images: Tools and editing programs for image compression
Once you have created and saved the right image dimensions for you, you are ready to optimize your images. With some tools you can optimize images online and without much effort. Compression can further reduce the file size. When compressing, however, make sure that the loss of quality is not too great. Unfortunately, image quality and storage requirements are directly dependent on each other, so the trick is to compress with as little loss as possible. Depending on the compression rate, you will notice varying degrees of lossy quality loss. The stronger the compression, the lower the color spectrum of the image will be. You will then have a file with a small file size, but you should not optimize images purely on principle. Ideally, the loss of quality is hardly or not at all visible to the naked eye, i.e. lossless. If you receive pixel images after compression, you should select a lower compression level. It may also be worth testing different optimizers for compression, as you will get different results depending on the compression method.
In some content management systems, it is even possible to integrate an optimization function using plugins, for example the Smush add-on for WordPress. The images can be optimized in the media library, so an additional tool is no longer absolutely necessary.
TinyPNG
With TinyPNG, you can compress PNG and JPG files without loss of quality. PNG files with transparency can even be compressed from 24 bits to 8 bits, which greatly reduces the file size.
Compressnow
With Compressnow you can set the compression level for JPG, PNG and GIF files yourself. When you upload a desired file, you are shown dynamically how the file size changes with different compression rates. The result is displayed immediately, which you can then save.
Optimizilla
With Optimizilla, you can compress 20 JPG or PNG files at once. The amount of data saved is clearly displayed for each file. However, you can also make even finer adjustments and set the compression for each file individually. If you are satisfied with the result, you can simply download the ZIP archive.
Compressor
With Compressor you can compress JPG, PNG and GIF files, whereby you can choose between a lossless and a lossy version. Compressor impresses with its modern and intuitive operation.
There are also numerous other online tools to optimize your images. Try out Ewww, Imageoptim, Optimole, Imagify or Shortpixel, for example, to find out which tool suits you best.

A good ranking in the Google image search
For many websites, Google image search has a high traffic potential. This is because image optimization (image SEO) is concerned with the goal of achieving a better ranking in the search and thus contributing to an increase in visibility. This should increase the number of interested users and potential customers.
If photos and graphics are clearly visible in the search results, users who enter the search query can go directly to the image search(Google Verticals) and click on the link to your website. To help you improve your search engine ranking in the image search, we have compiled a list of what you need to pay attention to when optimizing your images.
1. name file names with suitable keywords
When you save your image files, you first need suitable keywords in your file name. These keywords should succinctly summarize the image topic and content, but still describe it in as much detail as possible. You should also pay attention to other points when entering your images if you want to optimize them:
- File names should be as short as possible, but as long as necessary. A length of 256 characters should not be exceeded so that they can still be displayed correctly in the file directory. Keywords can usually be accommodated well with this number of characters.
- Write out umlauts.
- Separate the words with hyphens and write everything in lower case, as this is easier for most programs to interpret and thus reduces the potential for errors when embedding.
2. insert keywords in captions
You should also use keywords in the caption. The surrounding text should be taken into account here. This is recognized by the search engine and is also used for evaluation. The first text paragraph and the next (intermediate) heading should contain the relevant keywords in order to optimize the images.
3. use the correct image size, file size and format
As you have already read above, the ideal file format and image size depends on the intended use. Please note that the image files should also load during mobile surfing and when the user has poor reception. Therefore, the file size of your image should not cause long waiting times.
Tip: In the content area, your file size should not exceed 200 KB!
4. use images repeatedly
If possible, use the same image file more often on your website, as it signals a higher importance for Google. Of course, you should only use them if it makes sense in the context.

5. note the "title" and "alt attribute"
If you integrate photographs and vector graphics into a website, also name the "alt attribute" and the "title attribute" with the corresponding keywords. To explain this briefly once again:
What is the alt attribute?
The "alt attribute" is also known as alternative text and means that as soon as an image element is not displayed on the website, the alternative text is shown. This not only benefits the search engine, but also makes it easier for blind people and users with the graphic display switched off to read the text aloud.
What is the title attribute?
The "title attribute" contains text with additional information about the image. If it has been entered, it is displayed when the mouse is moved over it. The search engine therefore knows what topic it is dealing with or what is being depicted.
6. consideration of the age of the image
If possible, you should take into account an appropriate "age" of the image. Ideally, you should use photos and graphics that Google does not yet know. The younger the image element is, the more original and interesting it is for the search engine. Note: Google recognizes image files that have already been used on the web and also the publication date. For this reason, you should not include previously published images from third parties on your website, but rather use your own up-to-date images and optimize them.
7. integrate image sitemaps
If possible, you should integrate your image files into an XML sitemap, as this allows the search engine to capture images that might otherwise not be recognized. The XML sitemap is set up in such a way that it tells the search engine where to find which image file. You should make sure that photographs and the like are only listed above a certain size.
8. avoid the danger of hotlinks
It is desirable if your content is linked to from other websites, as this also signals a strong importance to Google. ATTENTION: However, this can also go in the wrong direction. If your image content is displayed via a hotlink on another domain, your search result may be overshadowed because your domain is not yet anchored strongly enough on the Internet. In this case, it won't help you to optimize your images because they won't be displayed.
9 URL and folder structure
Each image element on your website has its own URL. This usually results automatically from the assigned file names and the path resulting from your folder structure. You should ensure that the image files are stored in the folder with semantically correct names and avoid unnecessary intermediate directories.
10. page title
Choose a meaningful meta title (element of an HTML document - represents the unique title of the page) for your subpage to optimize your images. Ideally, this should also match the image content.
Our tip: Optimize images with the right image editing
Even if you want to be at the top of the rankings, you should not forget that your site is mainly visited by people and not just the crawler. So when you optimize images, you should also think about the appealing design. You can use these criteria to enhance existing image material:
The right alignment
If you want to optimize your images, it all starts with the right alignment. Make sure that the horizon is horizontal. If it is skewed, it disturbs perception.
Remove superfluous edges
Focus on the essentials by cropping the image element and cutting out anything superfluous. However, make sure that the dimensions of your file are still large enough for your intended use after cropping.
More expression through contrast
Most photos have too little contrast and are therefore not very expressive. Almost all free and paid tools for image editing have an automatic contrast function that you can use to optimize images without much prior knowledge. Manual contrast correction is also a good option with a little practice.
Fine-tuning: Optimizing images with depth, exposure and highlights
Here you can go into more detail and optimize and highlight individual areas of the images. The sliders for depth, exposure and highlights can be adjusted in more detail than the contrast slider.
Be careful with saturation
Do you want stronger colors? When optimizing your images, you should be careful with the saturation. Otherwise the photos will quickly appear squeaky. In some editing tools, you can use selective color correction for fine-tuning.
Sharpener
Many photos lack the right sharpness, especially on screen. If you still don't have enough contrast after adjusting the contrast, you can also use the sharpener to optimize your images.
High-quality image material is worthwhile for every website! For your own photos, we recommend professional photos taken by a photographer. However, there are also very good image databases that provide a large selection of images. We have summarized what these are for you in our article Image databases for companies. However, please note the terms of use of the image databases; not all of them allow the images to be edited using image editing programs. However, if you want to optimize the file size of the images, this is not a problem in most cases.

Do you need professional help with image optimization?
As part of a monthly support or creation of your website, we support you with image optimization and are available to answer your questions. Please feel free to contact us. We look forward to your inquiry!
File formats overview
The above article is regularly updated by us and brought up to date. You are welcome to download the infographic, share it or embed it on your website. We would be very pleased if you link to this article when using the infographic.